Posts

Rainbow Unicorn treat bag topper

Image
 Hello everyone,  Are you l ooking for a super easy rainbow unicorn themed treat idea for a party (or just for fun)?  Make some “unicorn treat bag toppers" How to Make Unicorn Rainbow Treats These snacks could not be more simple to put together!  Once you have gathered up your supplies, it’s as easy as filling bags and attaching tags! I cut the tag from Smooth White Card Stock, cut using the rectangle Stitched Die cut. I stamped this adorable unicorn & coloured with alcohol markers... The clouds were handcut. I popped the rainbow up with foam tape, and then cut a strip of white Card Stock, added a rainbow watercolour brush strokes and stamped "You' Are My Rainbow", from unicorn dreams stamp set.  Fill each clear treat bag with a small handful of rainbow sour candy. You can decide how much (or how little) will go in each bag. Fold the top of the clear bag down. Top each treat bag with one of our printable tags and staple it into place. These easy rainbow trea...

Rainbow cupcakes wishes- ft. Alphabet stencil

Image
Hello everyone,  its DT Jaya here again. Today it's my birthday... I love to bake sweet cupcakes, so I wanted to create a delicious birthday card using Tubbycraft stamps & stencil. For my card I used couple of techniques to make my card background. Want to create quick and easy titles, headings, sentiments, and more for your paper crafting projects? This stencil features the alphabet in a traditional stencil font. It is great for creating background textures, sentiments, and titles. Alphabet stencils look beautiful when blended with dye inks.  I Placed the stencil over the project area and secure it with washi tape, & Added a rainbow patterns to your project by blending inks, Gently pulled the stencil off from the project area to see the gorgeous look. After stenciling, I made rainbow ink smooshing background over the stenciled pattern area. I am in love with this Distress Ink Watercolor Smooshed Background.  I loved it so much that I didn't want to cover much of ...

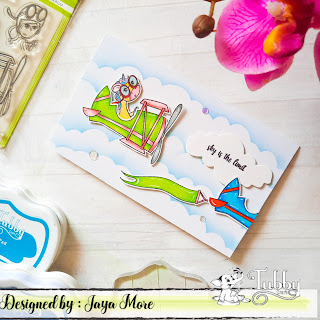
Sky is the limit- ft. Flying high stamp set

Image
  Hello everyone!  I’ve created a sweet little scene using the fun airplane image. I used newly launched Plane flying   stamp set from February release ! This is a very cute set with a plane and four different critters that you can use to fly the plane, so much fun! I choose to let the plain be flown by the adorable unicorn! I stamped the images and fussy cut these. You can place that image just so it will fit the drivers seat of the plane. This card is A2 size and I started by stenciling & masking the clouds over the card front. I then splattered it up with water. I Copic colored the image.  I stamped the plane image with black ink onto the white cardstock and then fussy cut out.   By fussy cutting right on the line, I then added the images into the scene along with some clouds to complete the card. Card-2 This is another great release over at Tubbycraft 🙂 It’s one of those releases which is awesome because it contains a lot of the essentail things we need...

Rowing Mice Card- DT| Jaya

Image
Hey friends! I'm back today with a sweet little card featuring mice day stamp from New February release by Tubbycraft.  Row, row, row your boat Gently down the stream Merrily merrily, merrily, merrily Life is but a dream … Card-1  For this card, I used the new "Rowing mice" stamp set and Stitched Simple Wavy Borders dies that I have in my stash. I started by die cutting all the elements for my scene. For the waves , I used the Stitched wavy Borders. I took white cardstock and ink blended it with tubby craft inks. The panels were sprayed with water to create a splotchy effect and then flicked with the same ink diluted with water on a paintbrush to created speckles. I stamped the images and colored them with Copic Markers.  I fussy cut all the images and assembled my card. I stamped the bird in the sky & added some cloud images and added that cute little  rhyme  sentiment at the top of the card. I adhered the die cut rectangle frame onto a cardbase.  F...

Giraffe love card ft watercolour stencil background

Image
Hi everyone! Its DT Jaya here!  May this Valentine's Day give you a lot of love and Happiness! Today I’m sharing this project over on the Tubbycraft blog  featuring watercolour lines stencil & giraffe love stamp set. because he is just so CUTE!! Look at that sweet face!!! For the background I used the  I used just one color of ink, then blended out with my brush over the stencil for an ombre effect.  I started from the upper middle point and then gradually inked toward to top and bottom.  I die cut a white cardsotck with the stitched rectangle die.  I masked some ink  on the rectangle panel as background. For the sentiment I used "you hold special place in my heart" from the same stamp set.  I stamped the super cute, giraffe  on smooth white cardstock and colored it with Copic markers. I also added glossy accents for shine. I think it also helps to give it a glossy look. All that was left was to assemble the card. I adhered the ink blend...

Beary Special Cards For Valentine's Day

Image
Hello everyone!  Today I'm sharing two cards featuring the stamp set beary wishes by tubby craft.  This set is so creative and fun!!  Who doesn't want a BEAR HUG for Valentine's Day!?  Card- 1 This stamp set includes solid images if you'd like to stamp with colored inks, or an outline image if you prefer coloring with markers, watercolor, or any other medium you like.   I had fun playing with both options!  There are sentiments for lots of different occasions, too! I started off by stamping the sweet little bear and the on a panel of white. Next I lightly stenciled the heart balloon background with tubby craft inks in the upper half of the panel. I used grassy edges stencil  to masking the grass using dye ink pad with blending tool then splash water.    Then I colored the image with alcohol markers and fussy cut it out , adding it to the panel with foam tape.  then added Glossy Accents to the nose of the bear, as well as e...