Posts

Showing posts from 2021

Merry & bright- Stenciled background card

Image
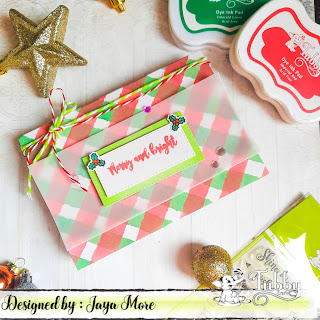
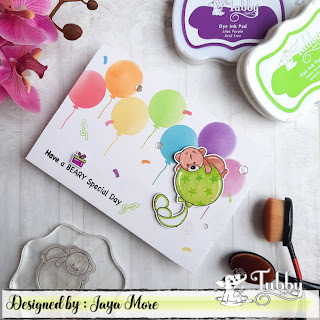
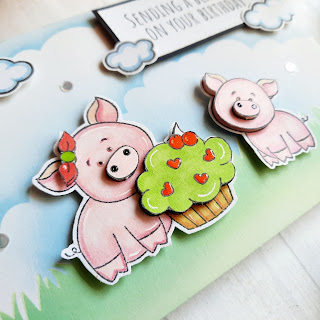
  Hi there!  It's almost Dec ember And I'm feeling the Christmas spirit at home and in the craft room! I stamped a lot this weekend and used my brand new stamps from Tubby Craft.  I swear I smile the entire time I'm using their fun and pretty stamps. They bring me joy for sure. I got to color, and glitter and generally get in the feeling of winter! I have two cards to share with you today! Let's kick off this season! So Today I’m sharing this project over on the tubby craft blog  featuring the watercolour lines stencil & shine on stamp set.  For the background I used the watercolour stripes stencil &  blended inks  for a nice, gradient effect. I die cut 2 stitched rectangle with white cardsotck &  I blended some emerald green  on the edges of the die cut. And For the sentiment I used the "Merry and Bright" from the same stamp set. Positioned the stencil on the diagonal ensuring that corners were included, then used some low tack tape to hold the st

Beary Special Birthday Cards using Balloon Stencils- Tubby Craft DT project

Image
Hello crafty peeps! It's Jaya here.   I'm so very pleased to be a part of this great company for another year and to be among the talented designers picked for this year's team! Here are my design team cards that I created for this special day. This is my first DT inspiration post for Tubby craft. Today I have a couple of Birthday cards with lots of balloons!  What's a party without them, right? :) Card 1 This stamp just is a wonderful and adorable image that makes me smile and I know the recipient be uplifted too:)   I know you will love it as much as I do:) This adorable bear is from the beary wishes stamp set.  I've had this stamp set forever and it's perfect for making birthday cards for all ages.  I created the balloon background by blending through Balloons Stencil  with a different color of Distress Ink listed below. I made sure to leave a little white spot on each one to show where the light reflects on the balloon.  I added a simple Birthday sentiment

Birthday Card Using little birdie- Hogs & Kisses

Image
  Hello,  Today we are showcasing an adorable new stamp set by little Birdie called "HOGS & KISSES"  Cutest little pigs ever!! For this card, I blended some broken China distressed  ink onto some smooth white card stock for the background. I blended green sprout using the grassy border Stencil from @waffleflowercrafts. The little pig and other stamps were colored with Copic markers and adhered with  foam tape to make 3d images.  I added a few puffy clouds to the sky and stamped  the sentiment. Thank you so much for stopping by! To grab this adorable piggies from the given store link.  https://itsybitsy.in/products/clear-stamp-hogs-kisses-4-5-x-6-5-13pc

Superhero theme Birthday Card

Image
  Hi Crafty Friends, Hi everyone! It's jaya  here.  Today I am sharing a Super Hero themed birthday card I created recently. Into the night to save the day!   Pj Masks inspired  birthday card, I'm really enjoy playing with Equipo Super stamp set from beadesign.bcn  It's so cute and creative!! While looking through my die stash recently, I discovered Square & rectangledies that I had apparently purchased a few years back and Of course I pulled it out so I could make a card using it in the future. Looking through some of my stamps to see what I could use with the die I have this fun Super Hero stamps from BeaDesigN. I continued the comic theme that I used on the front of the card. I coloured these superheroes with copic markers. I like how that small rectangle on the right handside is the  perfect size for a sentiment. Then I ink blended this die cuts with distressed oxide inks. After that I adhered these super little heroes on to these die cut blocks.  I had so much fun

Gatefold slide & lock card using rose bouquet digitalstamps from varada sharma designs

Image
Hello everyone, I'm super delighted to be video Designing with varada sharma today. Thank you so much for this opportunity.   Today’s fun fold card includes a front panel that slides over the gate fold to lock it in place. The front layer/panel of this card is comprised of four pieces all cut the same size. Two of the four pieces are scored and folded in half and act as the hinges for the slide mechanism. They are then adhered to a back piece for stability. The final piece provides a place for the card’s focal point plus added stability of the hinges. I used designer paper for the gate fold and image layer. I added several sequins from the pretty pink posh Sequins for added sparkle and texture.  #digitalstamps #floralcards #interactivecard  Gate Fold Base Thick Whisper White (base): 5.5″ x 8″, score at 2 ″ on one end and fold Fold the other end to meet the first fold lTrim 1/16″ from one end to allow a small amount of space for the slide and lock layer  Slide & Lock Layer Thick

Lets shell-abrate birthday card using studio katia stamps

Image
Hello everyone!  Today I have a really fun birthday card for u. The wavy stencil background I created with Distress Oxide inks in broken China. I added some ink water splatter for some texture too. I stamped all the pieces from the set onto some Neenah Solar white and coloured them with copic markers and added some white gel pen details. For the frame and outer piece I used the dies that I have in my crafty stash.  I worked out where I wanted all the elements and then stamped the sentiment on vellum strip. I then adhered all the pieces down, using foam tape on a couple for some dimension. I then added some foam tape to the frame and adhered this to main piece which I then added to a A2 card base. At this point I decided it still needed something so I went a little bit crazy with the bubbles.  This really is such a fun set and SO much fun to colour and play with. I hope you like the card I created. #cardoftheday #handmadecards #birthdaycards #turtle #cardmakingismysuperpower #inkon3 #wa

Valentine card using sweet heart digitalstamps

Image
Hello there,  it's time for another Valentine's card!!! I used this adorable sweet heart stamp set from @beadesigns.bcn and I really love this cute set.  Before I started with the little angels I created my background with distress inks. For this process I blended three distress inks by using my mini ink blending tool and After that I sprinklet water droplets to get this unique and awesome look. I die cut the background with the largest " Stitchted rectangles dies "and die cut some puffy clouds from white cardstock and vellum cloud border dies.  Then colored this sweet angel with my Copic markers. I fuzzy cut it then. I arranged the little scene and adhered it with double sided score tape. I stamped "Thinking of you " sentiment  on a cloud. I also stamped some hearts to finish up my card.  Thank you for stopping by and I'll see you soon. Hugs  💕Jaya💕 To grab this digis click on the below link to get it yours   https://www.etsy.com/listing/934220438/swe

Rainbow mail card using square dies

Image
Hello everyone!  It’s Jaya here.  Today I’m sharing a quick and easy card featuring  rainbow mail card using gina k designs stamp set. This card features some colorful ink blended die cut envelopes that I created using the stitched square dies .  This envelope is so stinking cute!  I’ve also used the  Mail Background stamp  to partially stamp a background on my card front.  I love to use partial stamping with background stamps to limit the pattern and keep my card from getting too busy.  It’s a great way to create a grounding point for your focal image or grouping. Thanks for stopping by today.  I hope you’ve enjoyed this project.  Use below lonk to go check out the video.. I hope everyone is getting  some crafty time today. https://youtu.be/khBXkXE07Ow #cardoftheday #envelopecard #squaredies #rainbowcards #stampingtechniques #ginakdesignstamps #timholtz #distressoxideinks #cardmakingismysuperpower #snailmailcards

Rocker card with winter love stamp set

Image
Hello everyone,   This is adorable shaped card actually rocks back and forth, how fun is that!? I used the circle nesting dies,  I cut one for scene and one for folded white cardstock next I used the stamp to make a cute little scene.  I used grass dies for ground. I added a sentiment on the top. Added some popping hearts & embellished  with glossy accents.  Hope you enjoyed my card!

Valantine's day hop- DIY stencil card using dies

Image
Valantine's day hop + Giveaway   Hello everyone,  Today, I'm excited to share a Happy Valentine's Day card with a Die Cut Stenciled heart Background.    For my valentine card I started with the background. I always wanted to try Distress Oxide inks over clean & white cardstock, so I used the Bokeh Hearts stencil with Candied Apple over white cardstock. I love these heart burst stencils that I made.  Then I stamped, coloured and die cut the cupid cuties and hearts from the clearly besotted stamp set .  I made extras as embellishments as usual. I used Copic markers to add colour.  To create a scene I die cut a stitched rectangle using the  Frames die set  from vellum as I did not want to cover the pretty stenciled background totally. I cut a  grassy border  from green cardstock and assembled the scene. I m hiding the liquid adhesive behind the die cute critters I layered the vellum over this. The stamped the sentiment on a white strip of cardstock and added it to the scen

Carnival polaroid card

Image
Hello everyone,  Today I'm sharing my 2nd design team project from @beadesigns.bcn  Instax® photos are popular for scrapbooks and journaling, to help keep memories of  special occasions. For my card, I created little photos of a carnival party memories. I chose Three images from carnival and colored with Copics. These Polaroid frames were covered  with white cardstock and I used the center of each frame to cut out each image. They were popped into the frame and taped in the back so they would stay in place. I chose a different sentiment for each frame and stamped them with Black Licorice Hybrid ink. A panel of striped paper was adhered to a 4 by 7" card base and the three frames were adhered over it. I finished off the card with red & white twine & clamped wooden peg at the center. I hope u like my carnival friends... Thank u so much stopping by.  To grab this carnaval digital set, click on below link https://www.etsy.com/listing/922285630/carnival-set?ref=shop_home_ac