Posts

Featured Post

Colorthrowdown Guest stamper challenge

Image
#Colorthrowdown #ctd579 Hello everyone, This is Jaya  here. I am sp happy & honored to be a  Guest designer @colorthrowdown challenge...  I am heading over to the colorthrowdown challenge. The color scheme is light blue, dark blue, pink & white . So, I am going to share this cute inspiration with u all... I used a simple stencil background on a white cardstock & randomly sponged two shades of Light blue at the edges & pink at the centre.  I used darling sweetie pie stamp set My favourite things, features a fresh pie from the oven, trio of Hearts.   I stamped & cutout the cupcake added to a card with foam tape.  then simply stamped sweetiepie sentiment & then pasted this to the base of dark blue cardstock .  It was done!!!  Hope u like it... do leave some love & feedback below. I will be back soon for more inspirations. Thank you... Happy crafting...

Pull tab flip card- ft. Dinosaur stamp set

Image
Hi Everyone, Today I want to show you a fun card with a little motion to it.  When you pull the tab, the front panel flips open to reveal a second panel hidden beneath it.  Isn't that fun?  I think so!  Watch the video below to see it in action and to learn how to make it. These are the basic sizes of cardstock you will need to create the card, plus a card base.  The 4 3/4 by 3 1/2 piece of cardstock.  This piece needs to be scored at 2inches and 2 1/2 inches. Fold it on the 2 1/2 inch score line. attach your first square right up to that 2 inch score line.  add some adhesive on the remaining part between the 2 and 2 1/2 inch score lines. Place your larger panel on top of  the smaller one, right up to that fold line, adhering only on the little space where you added adhesive in the photo above. unfold the tab piece and add a strip of adhesive just on the edge, under the smaller square.  Slide the tab piece through the slot in the base cardsto...

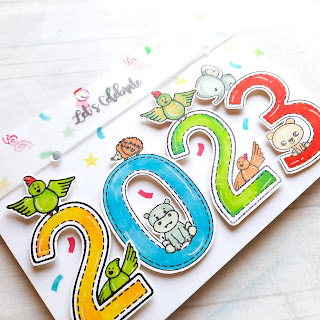
Let's Celebrate 2023- New Year Card

Image
Happy weekend everyone...!  To celebrate the new year, I created this fun and colorful card using brand new products. Have you all seen the Number Stamps  from Tubbycraft. I love them all. I’ve had a design in mind since the beginning and today I can finally share it with you! How awesome are these big bold numbers!?  I thought this one would like to smile and float! I stamped all of the images on white cardstock with a light color of ink and colored them in with colored pencils. I stamped the sentiment in the stamp set with jet black ink on a strip of vellum. I layered all of the stamped images over the background.

Birthday card- Dry embossing with alphabet stencil.

Image
  Hey there, Today I’m going to show you how to stretch your products—in this case stencils. Add ink to dry embossing is another way to use your stencils. Here’s what you’ll need for this technique: stencil, card stock, and inks—and a die cutting machine.  Next we’re going to dry emboss some card stock with the stencil. Your sandwich will be: whichever plates your machine requires; I use A and C plates on the bottom. Then the card stock and the stencil and the top plate, Run it through your machine as usual and this is what you end up with.  After embossing, I ink blended on letter ' Hi ' with green & lemon yellow ink. Then stamped happy birthday sentiment by using jet black ink below it.  To complete the card I used big birthday wishes Stamp Set, adhered cake & balloons images along with some foam tape for dimension and some heart embellishments. Thanks so much for stopping by! See you soon !

Spinner Wheel Cupcake Interactive

Image
Hey, everyone! It's DT Jaya here again,  I'm so excited about the Birthday Wishes stamp set  from Tubbycraft !  I love these sweet rainbow cupcakes!  I had to do something fun and amazing with them, so I made a spinning wheel card! I love how all of these Cupcakes move around in a circle, I used one of my favorite Balloon stencils to give a fun balloon stenciled background in pink.  My card was inspired by Jennifer McGuire's video tutorial. It's definitely one of my favorites!  To See this card in action, head over to my YouTube channel link below. https://youtube.com/shorts/mQOXYApWYA4?feature=share See you then! Supplies used-  Big birthday wishes Balloon stencil Light pink To purchase the product log on to- www.tubbycraft.com Tubby Craft products are available at following online retailers -  HNDMD  Crafters Emporio Crafters Corner

Surprise slider birthday card- DT Jaya

Image
Hellooo everyone!  I’m popping in today to share one of the projects that I created.  I LOVE interactive cards!!  And this card  features another fabulous piece-of-cake slider mechanism that has endless applications!!   I haven't used any dies  to create the slider feature of this card, – which is filled with surprises.  You MUST have this stamp set for your collection!   Here’s what the card looks like when you pull on that tab at the top of the image. How freakin’ cute is that?!!  Here’s how I created my card: 1. For my card, I took  an A2 size portrait folding card base. Firstly, I created a card background using balloon stencils with pink & yellow dye inks.  2.  Die cut an image panel from ivory cardstock  using the stitched rectangle dies  3. I stamp  the sentiment from the big  birthday wishes  at the top of the rectangle panel using jet black ink 4. I stamp the cake image, coloured ...

Plumeria Floral cards for Mother's day- ft.watercolour lines stencil

Image
Hello everyone, Its DT jaya here!  Mother’s Day is around the corner and I’m sure we all prepared cards for important women in our lives. But I’m still want to share a couple of ideas for such cards. Today I am popping in to share with you my mother’s day card with the PLUMERIA stamp set.  For my card, I first stamped a beautiful floral image  using jet black  Ink onto a ivory cardstock. I started by colouring these flowers with waterbrush markers, and then fussy cut them. I selected only one flower image with leaves which I added instead of letter 'O' The letters for " MOM "  were die cut from ivory card stock using alphabet dies and ink Blended the edges of letter M. & adhered to the stitched rectangle panel.  The bloom was substituted  for the "O" and adhered between the two M's.  After that, I use watercolour lines stencil for the background with modeling paste... Once it was dried, I then added this rectangle panel onto the stenciled car...

Interactive slider card without dies

Image
Interactive slider card Have you ever made a slider card?  If you've always wanted to know how then make sure to read this tutorial!  I created this card using the  HUGS & KISSES   Stamp set from little birdie crafts. Here's what you need: Clear Stamps A2 size cardstock base Ink & coloring supplies Foam tape Cutting knife and scale One hole punch 1 coin  Step 1 : Stamp & color image.   You can choose any type of stamp to create this card. For my card I stamped the pig with cupcake and little piglet in black ink & colored them with Copic Markers.  Step 2 : Create your slider channel.    You could make your piglet go straight.  I just cut a piece of card stock that was as wide as my card and then used one hole punch to create a slider channel.   Then I cut the piece of card stock that I will be using on my card. This one is also 4×6" wide. Make 2 holes on lower side of panel. Then, use a r...