Posts

Showing posts from 2022

Birthday card- Dry embossing with alphabet stencil.

Image
  Hey there, Today I’m going to show you how to stretch your products—in this case stencils. Add ink to dry embossing is another way to use your stencils. Here’s what you’ll need for this technique: stencil, card stock, and inks—and a die cutting machine.  Next we’re going to dry emboss some card stock with the stencil. Your sandwich will be: whichever plates your machine requires; I use A and C plates on the bottom. Then the card stock and the stencil and the top plate, Run it through your machine as usual and this is what you end up with.  After embossing, I ink blended on letter ' Hi ' with green & lemon yellow ink. Then stamped happy birthday sentiment by using jet black ink below it.  To complete the card I used big birthday wishes Stamp Set, adhered cake & balloons images along with some foam tape for dimension and some heart embellishments. Thanks so much for stopping by! See you soon !

Spinner Wheel Cupcake Interactive

Image
Hey, everyone! It's DT Jaya here again,  I'm so excited about the Birthday Wishes stamp set  from Tubbycraft !  I love these sweet rainbow cupcakes!  I had to do something fun and amazing with them, so I made a spinning wheel card! I love how all of these Cupcakes move around in a circle, I used one of my favorite Balloon stencils to give a fun balloon stenciled background in pink.  My card was inspired by Jennifer McGuire's video tutorial. It's definitely one of my favorites!  To See this card in action, head over to my YouTube channel link below. https://youtube.com/shorts/mQOXYApWYA4?feature=share See you then! Supplies used-  Big birthday wishes Balloon stencil Light pink To purchase the product log on to- www.tubbycraft.com Tubby Craft products are available at following online retailers -  HNDMD  Crafters Emporio Crafters Corner

Surprise slider birthday card- DT Jaya

Image
Hellooo everyone!  I’m popping in today to share one of the projects that I created.  I LOVE interactive cards!!  And this card  features another fabulous piece-of-cake slider mechanism that has endless applications!!   I haven't used any dies  to create the slider feature of this card, – which is filled with surprises.  You MUST have this stamp set for your collection!   Here’s what the card looks like when you pull on that tab at the top of the image. How freakin’ cute is that?!!  Here’s how I created my card: 1. For my card, I took  an A2 size portrait folding card base. Firstly, I created a card background using balloon stencils with pink & yellow dye inks.  2.  Die cut an image panel from ivory cardstock  using the stitched rectangle dies  3. I stamp  the sentiment from the big  birthday wishes  at the top of the rectangle panel using jet black ink 4. I stamp the cake image, coloured with alcohol markers & fussy cut it into two different layers.  5. Then stamp  the bea

Plumeria Floral cards for Mother's day- ft.watercolour lines stencil

Image
Hello everyone, Its DT jaya here!  Mother’s Day is around the corner and I’m sure we all prepared cards for important women in our lives. But I’m still want to share a couple of ideas for such cards. Today I am popping in to share with you my mother’s day card with the PLUMERIA stamp set.  For my card, I first stamped a beautiful floral image  using jet black  Ink onto a ivory cardstock. I started by colouring these flowers with waterbrush markers, and then fussy cut them. I selected only one flower image with leaves which I added instead of letter 'O' The letters for " MOM "  were die cut from ivory card stock using alphabet dies and ink Blended the edges of letter M. & adhered to the stitched rectangle panel.  The bloom was substituted  for the "O" and adhered between the two M's.  After that, I use watercolour lines stencil for the background with modeling paste... Once it was dried, I then added this rectangle panel onto the stenciled cardbase w

Interactive slider card without dies

Image
Interactive slider card Have you ever made a slider card?  If you've always wanted to know how then make sure to read this tutorial!  I created this card using the  HUGS & KISSES   Stamp set from little birdie crafts. Here's what you need: Clear Stamps A2 size cardstock base Ink & coloring supplies Foam tape Cutting knife and scale One hole punch 1 coin  Step 1 : Stamp & color image.   You can choose any type of stamp to create this card. For my card I stamped the pig with cupcake and little piglet in black ink & colored them with Copic Markers.  Step 2 : Create your slider channel.    You could make your piglet go straight.  I just cut a piece of card stock that was as wide as my card and then used one hole punch to create a slider channel.   Then I cut the piece of card stock that I will be using on my card. This one is also 4×6" wide. Make 2 holes on lower side of panel. Then, use a ruler and mark it to the punched circles from each side and cut it.  Ste

Rainbow Unicorn treat bag topper

Image
 Hello everyone,  Are you l ooking for a super easy rainbow unicorn themed treat idea for a party (or just for fun)?  Make some “unicorn treat bag toppers" How to Make Unicorn Rainbow Treats These snacks could not be more simple to put together!  Once you have gathered up your supplies, it’s as easy as filling bags and attaching tags! I cut the tag from Smooth White Card Stock, cut using the rectangle Stitched Die cut. I stamped this adorable unicorn & coloured with alcohol markers... The clouds were handcut. I popped the rainbow up with foam tape, and then cut a strip of white Card Stock, added a rainbow watercolour brush strokes and stamped "You' Are My Rainbow", from unicorn dreams stamp set.  Fill each clear treat bag with a small handful of rainbow sour candy. You can decide how much (or how little) will go in each bag. Fold the top of the clear bag down. Top each treat bag with one of our printable tags and staple it into place. These easy rainbow treats ar

Rainbow cupcakes wishes- ft. Alphabet stencil

Image
Hello everyone,  its DT Jaya here again. Today it's my birthday... I love to bake sweet cupcakes, so I wanted to create a delicious birthday card using Tubbycraft stamps & stencil. For my card I used couple of techniques to make my card background. Want to create quick and easy titles, headings, sentiments, and more for your paper crafting projects? This stencil features the alphabet in a traditional stencil font. It is great for creating background textures, sentiments, and titles. Alphabet stencils look beautiful when blended with dye inks.  I Placed the stencil over the project area and secure it with washi tape, & Added a rainbow patterns to your project by blending inks, Gently pulled the stencil off from the project area to see the gorgeous look. After stenciling, I made rainbow ink smooshing background over the stenciled pattern area. I am in love with this Distress Ink Watercolor Smooshed Background.  I loved it so much that I didn't want to cover much of it up

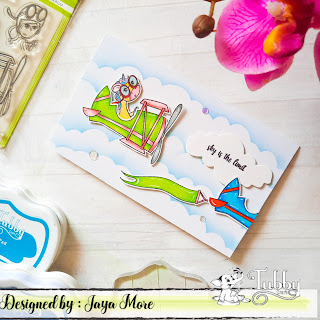
Sky is the limit- ft. Flying high stamp set

Image
  Hello everyone!  I’ve created a sweet little scene using the fun airplane image. I used newly launched Plane flying   stamp set from February release ! This is a very cute set with a plane and four different critters that you can use to fly the plane, so much fun! I choose to let the plain be flown by the adorable unicorn! I stamped the images and fussy cut these. You can place that image just so it will fit the drivers seat of the plane. This card is A2 size and I started by stenciling & masking the clouds over the card front. I then splattered it up with water. I Copic colored the image.  I stamped the plane image with black ink onto the white cardstock and then fussy cut out.   By fussy cutting right on the line, I then added the images into the scene along with some clouds to complete the card. Card-2 This is another great release over at Tubbycraft 🙂 It’s one of those releases which is awesome because it contains a lot of the essentail things we need for cardmaking all the